
Category Archives: Arduino
Max6675 Thermocouple Arduino Code
#include "Max6675.h"

Max6675 ts(8, 9, 10);
// Max6675 module: SO on pin #8, SS on pin #9, CSK on pin #10 of Arduino UNO

void setup()
{
  ts.setOffset(0);
  // set offset for temperature measurement.
  Serial.begin(9600);
}

void loop()
{
  Serial.print(ts.getCelsius(), 2);
  Serial.print(" C / ");
  Serial.print(ts.getFahrenheit(), 2);
  Serial.print(" F / ");
  Serial.print(ts.getKelvin(), 2);
  Serial.print(" Kn");
  Serial.println();
  delay(2000);
}
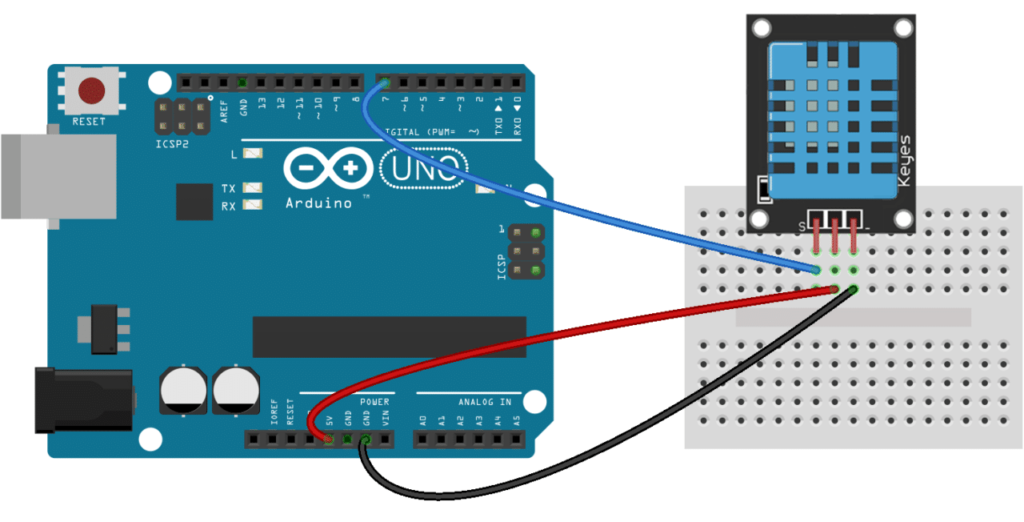
DHT11 Arduino Wiring
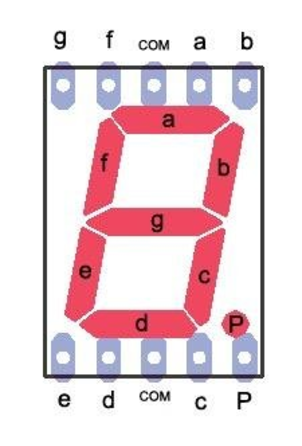
7-Segment Display with Switch/Case
int a = 6;
int b = 5;
int c = 2;
int d = 3;
int e = 4;
int f = 7;
int g = 8;
int p = 9;

void setup() {
  pinMode(c, OUTPUT);
  pinMode(d, OUTPUT);
  pinMode(e, OUTPUT);
  pinMode(b, OUTPUT);
  pinMode(a, OUTPUT);
  pinMode(f, OUTPUT);
  pinMode(g, OUTPUT);
  pinMode(p, OUTPUT);
  pinMode(A1, INPUT);
  pinMode(A2, INPUT);
  Serial.begin(9600);
}

int num = 1;
int xvalue;

void loop() {

  LEDplay(num);
  delay(1000);
  xvalue = analogRead(A1);

  if(xvalue > 1000){
    num = num+1;
    num = num%10;
  }
  if(xvalue < 10){
    num = num-1;
    num = num%10;
  }
  if(num < 0){
    num = 9;
  }

}

void LEDplay(int num){
  switch (num) {
    case 0:
      zero();
      break;
    case 1:
      one();
      break;
    case 2:
      two();
      break;
    case 3:
      three();
      break;
    case 4:
      four();
      break;
    case 5:
      five();
      break;
    case 6:
      six();
      break;
    case 7:
      seven();
      break;
    case 8:
      eight();
      break;
    case 9:
      nine();
      break;
    default:
      //do nothing
      break;
  }
}

void one(){
  digitalWrite(a, LOW);
  digitalWrite(b, HIGH);
  digitalWrite(c, HIGH);
  digitalWrite(d, LOW);
  digitalWrite(e, LOW);
  digitalWrite(f, LOW);
  digitalWrite(g, LOW);
  digitalWrite(p, LOW);
}

void two(){
  digitalWrite(a, HIGH);
  digitalWrite(b, HIGH);
  digitalWrite(c, LOW);
  digitalWrite(d, HIGH);
  digitalWrite(e, HIGH);
  digitalWrite(f, LOW);
  digitalWrite(g, HIGH);
  digitalWrite(p, LOW);
}

void three(){
  digitalWrite(a, HIGH);
  digitalWrite(b, HIGH);
  digitalWrite(c, HIGH);
  digitalWrite(d, HIGH);
  digitalWrite(e, LOW);
  digitalWrite(f, LOW);
  digitalWrite(g, HIGH);
  digitalWrite(p, LOW);
}

void four(){
  digitalWrite(a, LOW);
  digitalWrite(b, HIGH);
  digitalWrite(c, HIGH);
  digitalWrite(d, LOW);
  digitalWrite(e, LOW);
  digitalWrite(f, HIGH);
  digitalWrite(g, HIGH);
  digitalWrite(p, LOW);
}

void five(){
  digitalWrite(a, HIGH);
  digitalWrite(b, LOW);
  digitalWrite(c, HIGH);
  digitalWrite(d, HIGH);
  digitalWrite(e, LOW);
  digitalWrite(f, HIGH);
  digitalWrite(g, HIGH);
  digitalWrite(p, LOW);
}

void six(){
  digitalWrite(a, HIGH);
  digitalWrite(b, LOW);
  digitalWrite(c, HIGH);
  digitalWrite(d, HIGH);
  digitalWrite(e, HIGH);
  digitalWrite(f, HIGH);
  digitalWrite(g, HIGH);
  digitalWrite(p, LOW);
}

void seven(){
  digitalWrite(a, HIGH);
  digitalWrite(b, HIGH);
  digitalWrite(c, HIGH);
  digitalWrite(d, LOW);
  digitalWrite(e, LOW);
  digitalWrite(f, LOW);
  digitalWrite(g, LOW);
  digitalWrite(p, LOW);
}

void eight(){
  digitalWrite(a, HIGH);
  digitalWrite(b, HIGH);
  digitalWrite(c, HIGH);
  digitalWrite(d, HIGH);
  digitalWrite(e, HIGH);
  digitalWrite(f, HIGH);
  digitalWrite(g, HIGH);
  digitalWrite(p, LOW);
}

void nine(){
  digitalWrite(a, HIGH);
  digitalWrite(b, HIGH);
  digitalWrite(c, HIGH);
  digitalWrite(d, LOW);
  digitalWrite(e, LOW);
  digitalWrite(f, HIGH);
  digitalWrite(g, HIGH);
  digitalWrite(p, LOW);
}

void zero(){
  digitalWrite(a, HIGH);
  digitalWrite(b, HIGH);
  digitalWrite(c, HIGH);
  digitalWrite(d, HIGH);
  digitalWrite(e, HIGH);
  digitalWrite(f, HIGH);
  digitalWrite(g, LOW);
  digitalWrite(p, LOW);
}
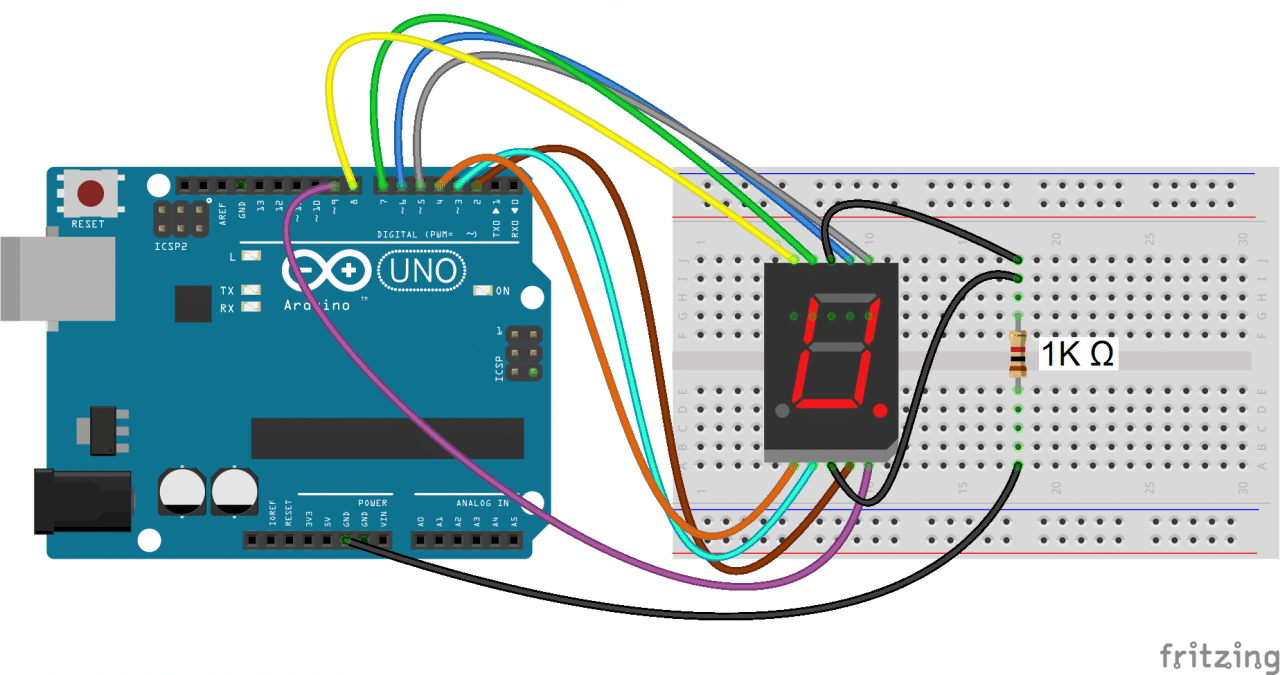
7-Segment Display Wiring Arduino
Arduino Joystick Demo
 int joyPin1 = A0;                 // slider variable connected to analog pin 0
 int joyPin2 = A1;                 // slider variable connected to analog pin 1
 int value1 = 0;                  // variable to read the value from the analog pin 0
 int value2 = 0;                  // variable to read the value from the analog pin 1

 void setup() {
  pinMode(joyPin1, INPUT);
  pinMode(joyPin2, INPUT);
  Serial.begin(9600);
 }

 void loop() {
  value1 = analogRead(joyPin1);
  value2 = analogRead(joyPin2);

  delay(100);
  Serial.print("Pin1: ");
  Serial.print(value1);
  Serial.print(" Pin2: ");
  Serial.println(value2);
}
Arduino Serial Demo
void setup() {
  Serial.begin(9600);
}
int i = 1;
void loop() {
  Serial.println("Each line of code will be delayed by 1 second");
  delay(1000);
  Serial.println("Also, integer i will count upwards by one!");
  delay(1000);
  Serial.println(i);
  i = i+1;
}
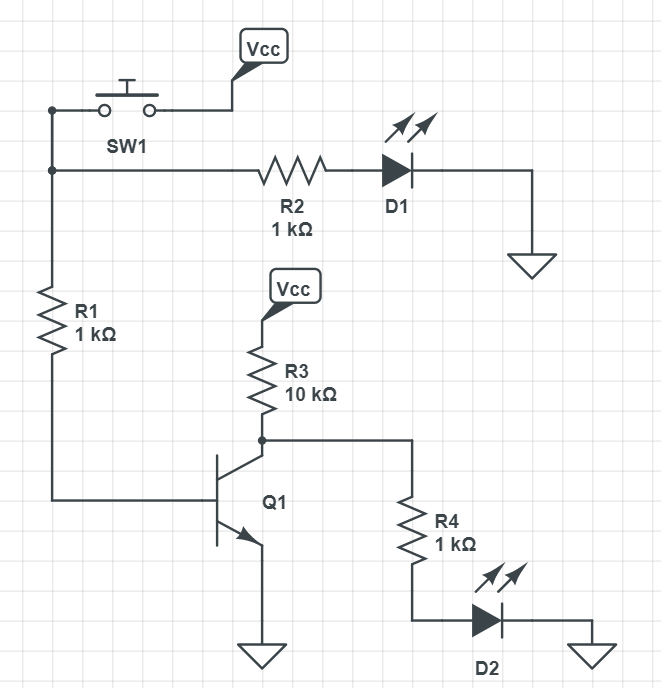
Building a NOT Gate

Current Bogie Code *Change Port Definitions*
#define left1 32
#define left2 26
#define right2 30
#define right1 28
#define eLeft A8
#define eRight A9
//********************************************************************************************************************************************************************************************
#include <LiquidCrystal.h>
int lcd_key     = 0;
int adc_key_in  = 0;
// select the pins used on the LCD panel
LiquidCrystal lcd(8, 9, 4, 5, 6, 7);
//********************************************************************************************************************************************************************************************
String data="";
int mark = 0;
boolean Mark_Start=false;
boolean valid=false;
String GGAUTCtime,GGAlatitude,GGAlongitude,GPStatus,SatelliteNum,HDOPfactor,Height,
PositionValid,RMCUTCtime,RMClatitude,RMClongitude,Speed,Direction,Date,Declination,Mode;
//********************************************************************************************************************************************************************************************
int longitude, latitude;
//********************************************************************************************************************************************************************************************
void setup() {
  pinMode(right1, OUTPUT);
  pinMode(right2, OUTPUT);
  pinMode(left1, OUTPUT);
  pinMode(left2, OUTPUT);
  pinMode(eLeft, OUTPUT);
  pinMode(eRight, OUTPUT);
  digitalWrite(eLeft, HIGH);
  digitalWrite(eRight, HIGH);
//********************************************************************************************************************************************************************************************
  Serial.begin(9600);
  Serial1.begin(9600);
  Serial.println(0);
  delay(1000);
  pinMode(21, OUTPUT);
  digitalWrite (21, HIGH);
  pinMode(20, OUTPUT);
  digitalWrite (20, LOW);
  lcd.begin(16, 2);              // start the library
  lcd.setCursor(0,0);
  lcd.print("Initializing GPS"); // print a simple message
}
bool clipped = 0;
//********************************************************************************************************************************************************************************************
void loop() {
  gpsBoi();
  clipped = 0;
}
//********************************************************************************************************************************************************************************************
void turnLeft(int speed){
  analogWrite(left2, speed);
  digitalWrite(left1, LOW);
  analogWrite(right1, speed);
  digitalWrite(right2, LOW);
}
//******************************
void turnRight(int speed){
  analogWrite(left1, speed);
  digitalWrite(left2, LOW);
  analogWrite(right2, speed);
  digitalWrite(right1, LOW);
}
//******************************
void moveForwards(int speed){
analogWrite(right1, speed);
digitalWrite(right2, LOW);
analogWrite(left1, speed);
digitalWrite(left2, LOW);
}
//******************************
void moveBackwards(int speed){
analogWrite(right2, speed);
digitalWrite(right1, LOW);
analogWrite(left2, speed);
digitalWrite(left1, LOW);
}
//******************************
void turn90right(){
  turnRight(150);
  delay(985);
}
void turn90left(){
  turnLeft(150);
  delay(985);
}
//******************************
void halt(){
digitalWrite(right2, LOW);
digitalWrite(right1, LOW);
digitalWrite(left2, LOW);
digitalWrite(left1, LOW);
}
//******************************
void gpsBoi(){
    while (Serial1.available()> 0){
    if(Mark_Start){
      data=reader();
      Serial.println(data);
      if(data.equals("GPGGA")){
        //Serial.println(1);
        GGAUTCtime=reader();
        GGAlatitude=reader();
        GGAlatitude+=reader();
        GGAlongitude=reader();
        GGAlongitude+=reader();
        GPStatus=reader();
        SatelliteNum=reader();
        HDOPfactor=reader();
        Height=reader();
        Mark_Start=false;
        valid=true;
        data="";

      }
      else if(data.equals("GPGSA")){
        Serial.println(2);
        Mark_Start=false;
        data="";
      }
      else if(data.equals("GPGSV")){
        Serial.println(3);
        Mark_Start=false;
        data="";
      }
      else if(data.equals("GPRMC")){
        //Serial.println(4);
        RMCUTCtime=reader();
        PositionValid=reader();
        RMClatitude=reader();
        RMClatitude+=reader();
        RMClongitude=reader();
        RMClongitude+=reader();
        Speed=reader();
        Direction=reader();
        Date=reader();
        Declination=reader();
        Declination+=reader();
        Mode=reader();
        valid=true;
        Mark_Start=false;
        data="";
      }
      else if(data.equals("GPVTG")){
        Serial.println(5);
        Mark_Start=false;
        data="";
      }
      else{
        Serial.println(6);
        Mark_Start=false;
        data="";
      }
    }
    if(valid){
      if(PositionValid=="A"){
        Serial.println("Position Valid");
        lcd.clear();
      }
      else{
        Serial.println("Your position is not valid.");
      }
      //lcd.clear();
      clearCoord();
      Serial.print("Date:");
      Serial.println(Date);
      Serial.print("UTCtime:");
      Serial.print(RMCUTCtime);
      Serial.print("   ");
      Serial.println(GGAUTCtime);
      Serial.print("Latitude:");
      Serial.print(RMClatitude);
      lcd.setCursor(0,0);
      lcd.print(latitude);
      Serial.print("   ");
      Serial.println(GGAlatitude);
      Serial.print("Longitude:");
      Serial.print(RMClongitude);
      lcd.setCursor(0,1);
      lcd.print(longitude);
      Serial.println("LONGITUDE THE REAL ONE");
      Serial.println(longitude);
      Serial.println("LATITUDE THE REAL ONE");
      Serial.println(latitude);
      Serial.print("   ");
      Serial.println(GGAlongitude);
      Serial.print("GPStatus:");
      Serial.println(GPStatus);
      Serial.print("SatelliteNum:");
      Serial.println(SatelliteNum);
      Serial.print("HDOPfactor:");
      Serial.println(HDOPfactor);
      Serial.print("Height:");
      Serial.println(Height);
      Serial.print("Speed:");
      Serial.println(Speed);
      Serial.print("Direction:");
      Serial.println(Direction);
      Serial.print("Declination:");
      Serial.println(Declination);
      Serial.print("Mode:");
      Serial.println(Mode);
      valid=false;
    }
    if(Serial1.find("$")){
      Serial.println("capture");
      Mark_Start=true;
    }
  }
}

String reader(){
  String value="";
  int temp;
startover:
  while (Serial1.available() > 0){
    delay(2);
    temp=Serial1.read();
    if((temp==',')||(temp=='*')){
      if(value.length()){
        //Serial.println("meaningful message");
        return value;
      }
      else {
        //Serial.println("empty");
        return "";
      }
    }
    else if(temp=='$'){
      //Serial.println("failure");
      Mark_Start=false;
    }
    else{
      //Serial.println("add");
      value+=char(temp);
    }
  }
  while (!(Serial1.available()>0)){
  }
  goto startover;
}
//******************************
void clearCoord(){
  if(clipped == 0){
    RMClatitude.remove(RMClatitude.length()-1);
    RMClongitude.remove(RMClongitude.length()-1);
    RMClatitude.remove(0,5);
    RMClongitude.remove(0,6);
    latitude = RMClatitude.toInt();
    longitude = RMClongitude.toInt();
  }
  clipped = 1;
  }
Rocker-Bogie GPS and Motor Control Code
#define left1 32
#define left2 26
#define right2 30
#define right1 28
#define eLeft A8
#define eRight A9
//********************************************************************************************************************************************************************************************
#include <LiquidCrystal.h>
int lcd_key     = 0;
int adc_key_in  = 0;
// select the pins used on the LCD panel
LiquidCrystal lcd(8, 9, 4, 5, 6, 7);
//********************************************************************************************************************************************************************************************
String data="";
int mark = 0;
boolean Mark_Start=false;
boolean valid=false;
String GGAUTCtime,GGAlatitude,GGAlongitude,GPStatus,SatelliteNum,HDOPfactor,Height,
PositionValid,RMCUTCtime,RMClatitude,RMClongitude,Speed,Direction,Date,Declination,Mode;
//********************************************************************************************************************************************************************************************
int longitude, latitude;
//********************************************************************************************************************************************************************************************
void setup() {
  pinMode(right1, OUTPUT);
  pinMode(right2, OUTPUT);
  pinMode(left1, OUTPUT);
  pinMode(left2, OUTPUT);
  pinMode(eLeft, OUTPUT);
  pinMode(eRight, OUTPUT);
  digitalWrite(eLeft, HIGH);
  digitalWrite(eRight, HIGH);
//********************************************************************************************************************************************************************************************
  Serial.begin(9600);
  Serial1.begin(9600);
  Serial.println(0);
  delay(1000);
  pinMode(21, OUTPUT);
  digitalWrite (21, HIGH);
  pinMode(20, OUTPUT);
  digitalWrite (20, LOW);
  lcd.begin(16, 2);              // start the library
  lcd.setCursor(0,0);
  lcd.print("Initializing GPS"); // print a simple message
}
//********************************************************************************************************************************************************************************************
void loop() {
  gpsGet();
}
//********************************************************************************************************************************************************************************************
void turnLeft(int speed){
  analogWrite(left2, speed);
  digitalWrite(left1, LOW);
  analogWrite(right1, speed);
  digitalWrite(right2, LOW);
}
//******************************
void turnRight(int speed){
  analogWrite(left1, speed);
  digitalWrite(left2, LOW);
  analogWrite(right2, speed);
  digitalWrite(right1, LOW);
}
//******************************
void moveForwards(int speed){
analogWrite(right1, speed);
digitalWrite(right2, LOW);
analogWrite(left1, speed);
digitalWrite(left2, LOW);
}
//******************************
void moveBackwards(int speed){
analogWrite(right2, speed);
digitalWrite(right1, LOW);
analogWrite(left2, speed);
digitalWrite(left1, LOW);
}
//******************************
void turn90right(){
  turnRight(150);
  delay(985);
}
void turn90left(){
  turnLeft(150);
  delay(985);
}
//******************************
void haltyoudemon(){
digitalWrite(right2, LOW);
digitalWrite(right1, LOW);
digitalWrite(left2, LOW);
digitalWrite(left1, LOW);
}
//******************************
void gpsGet(){
    while (Serial1.available()> 0){
    if(Mark_Start){
      data=reader();
      Serial.println(data);
      if(data.equals("GPGGA")){
        //Serial.println(1);
        GGAUTCtime=reader();
        GGAlatitude=reader();
        GGAlatitude+=reader();
        GGAlongitude=reader();
        GGAlongitude+=reader();
        GPStatus=reader();
        SatelliteNum=reader();
        HDOPfactor=reader();
        Height=reader();
        Mark_Start=false;
        valid=true;
        data="";

      }
      else if(data.equals("GPGSA")){
        Serial.println(2);
        Mark_Start=false;
        data="";
      }
      else if(data.equals("GPGSV")){
        Serial.println(3);
        Mark_Start=false;
        data="";
      }
      else if(data.equals("GPRMC")){
        //Serial.println(4);
        RMCUTCtime=reader();
        PositionValid=reader();
        RMClatitude=reader();
        RMClatitude+=reader();
        RMClongitude=reader();
        RMClongitude+=reader();
        Speed=reader();
        Direction=reader();
        Date=reader();
        Declination=reader();
        Declination+=reader();
        Mode=reader();
        valid=true;
        Mark_Start=false;
        data="";
      }
      else if(data.equals("GPVTG")){
        Serial.println(5);
        Mark_Start=false;
        data="";
      }
      else{
        Serial.println(6);
        Mark_Start=false;
        data="";
      }
    }
    if(valid){
      if(PositionValid=="A"){
        Serial.println("Position Valid");
      }
      else{
        Serial.println("Your position is not valid.");
      }
      lcd.clear();
      CoordNum();
      Serial.print("Date:");
      Serial.println(Date);
      Serial.print("UTCtime:");
      Serial.print(RMCUTCtime);
      Serial.print("   ");
      Serial.println(GGAUTCtime);
      Serial.print("Latitude:");
      Serial.print(RMClatitude);
      lcd.setCursor(0,0);
      lcd.print(RMClatitude);
      Serial.print("   ");
      Serial.println(GGAlatitude);
      Serial.print("Longitude:");
      Serial.print(RMClongitude);
      lcd.setCursor(0,1);
      lcd.print(RMClongitude);
      Serial.print("   ");
      Serial.println(GGAlongitude);
      Serial.print("GPStatus:");
      Serial.println(GPStatus);
      Serial.print("SatelliteNum:");
      Serial.println(SatelliteNum);
      Serial.print("HDOPfactor:");
      Serial.println(HDOPfactor);
      Serial.print("Height:");
      Serial.println(Height);
      Serial.print("Speed:");
      Serial.println(Speed);
      Serial.print("Direction:");
      Serial.println(Direction);
      Serial.print("Declination:");
      Serial.println(Declination);
      Serial.print("Mode:");
      Serial.println(Mode);
      valid=false;
    }
    if(Serial1.find("$")){
      Serial.println("capture");
      Mark_Start=true;
    }
  }
}

String reader(){
  String value="";
  int temp;
startover:
  while (Serial1.available() > 0){
    delay(2);
    temp=Serial1.read();
    if((temp==',')||(temp=='*')){
      if(value.length()){
        //Serial.println("meaningful message");
        return value;
      }
      else {
        //Serial.println("empty");
        return "";
      }
    }
    else if(temp=='$'){
      //Serial.println("failure");
      Mark_Start=false;
    }
    else{
      //Serial.println("add");
      value+=char(temp);
    }
  }
  while (!(Serial1.available()>0)){
  }
  goto startover;
}
//******************************
void CoordNum(){
  RMClatitude.remove(RMClatitude.length()-1);
  RMClongitude.remove(RMClongitude.length()-1);
  latitude = RMClatitude.toInt();
  longitude = RMClongitude.toInt();
}